10 Tips for Installing Flat Panel Wainscoting Like a Pro
Flat panel wainscoting is a stylish addition to any home, transforming ordinary walls into stunning visual statements. According to a report from the National Association of Home Builders, the demand for decorative wall features has surged by over 30% in recent years. This trend highlights the growing appreciation for interior aesthetics and functional design.
Industry expert John H. Smith emphasizes, “Flat panel wainscoting offers both charm and value, making it a top choice among homeowners.” This appeal stems from its versatility and ease of installation, yet it’s not without challenges. Achieving a professional finish requires careful planning and skill.
Many DIY enthusiasts underestimate the intricacies involved. Miscalculations can lead to uneven panels and unsatisfactory results. Precision is key when measuring and cutting. Familiarizing oneself with the tools and techniques can result in a beautiful installation, but haste often leads to mistakes.
Choosing the Right Materials for Flat Panel Wainscoting Installation
When installing flat panel wainscoting, selecting the right materials is crucial. Studies show that up to 80% of the project's success hinges on material quality. Common choices include MDF, plywood, and solid wood. Each carries distinct benefits and drawbacks. MDF is cost-effective and easy to paint but may not withstand moisture well. Solid wood offers durability, yet it can be expensive.
Tip: Consider the location of installation. Areas with high humidity require moisture-resistant materials. For example, wood might swell or warp in damp bathrooms.
Another consideration is finishing. Proper paint or stain not only enhances aesthetic appeal but also adds an additional layer of protection. This is critical in maintaining your wainscoting over time. Reports highlight that well-finished wainscoting can last more than a decade without major issues.
Tip: Don’t skip proper sealing. It protects your investment, especially when choosing products for high-traffic areas. Remember, the materials you choose reflect your home's style and longevity. A hasty decision can lead to regrets down the road.
10 Tips for Installing Flat Panel Wainscoting Like a Pro - Choosing the Right Materials for Flat Panel Wainscoting Installation
| Tip Number |
Tip Description |
Recommended Material |
Key Benefits |
| 1 |
Choose the right wood type |
Hardwood (e.g., Oak or Maple) |
Durable and attractive finish |
| 2 |
Consider MDF for cost efficiency |
MDF (Medium Density Fiberboard) |
Smooth surface for painting |
| 3 |
Select a suitable panel style |
Flat Panels or Raised Panels |
Enhances aesthetic appeal |
| 4 |
Opt for pre-primed materials |
Pre-primed Wood or MDF |
Saves time on painting |
| 5 |
Use proper adhesives |
Carpenter's Glue or Construction Adhesive |
Ensures a strong bond |
| 6 |
Choose the right tools for cutting |
Miter Saw or Table Saw |
Achieve precise cuts |
| 7 |
Plan your layout in advance |
Design Blueprint or Sketch |
Avoid mistakes during installation |
| 8 |
Consider paint or stain finish |
Acrylic Paint or Wood Stain |
Increase longevity and visual appeal |
| 9 |
Use a level for perfect alignment |
Quality Level Tool |
Ensures even installation |
| 10 |
Finish with trim moldings |
Baseboard or Crown Molding |
Completes the look with elegance |
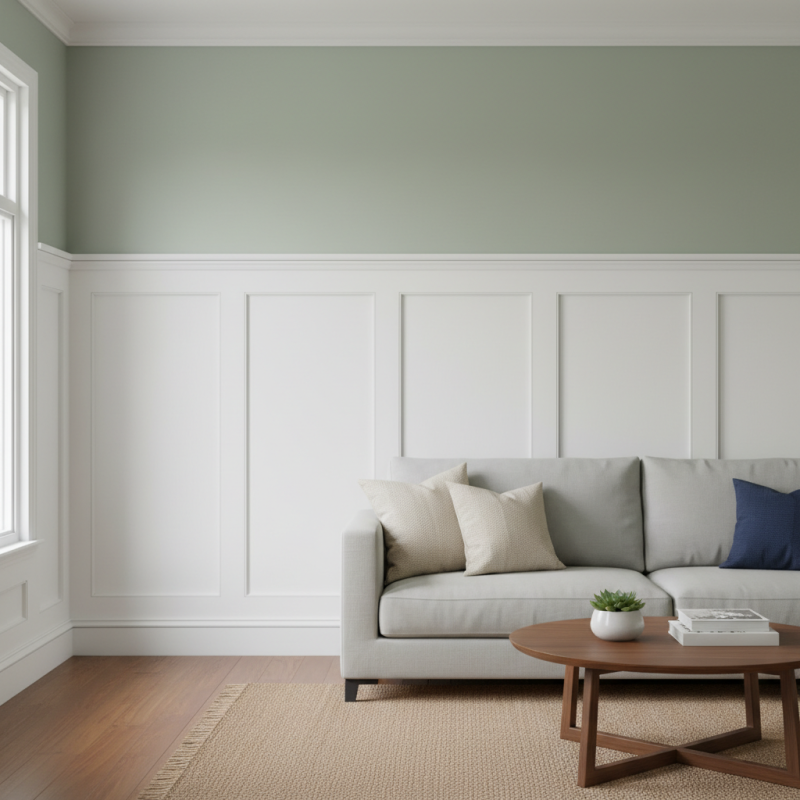
Preparing the Wall Surface for Flat Panel Wainscoting
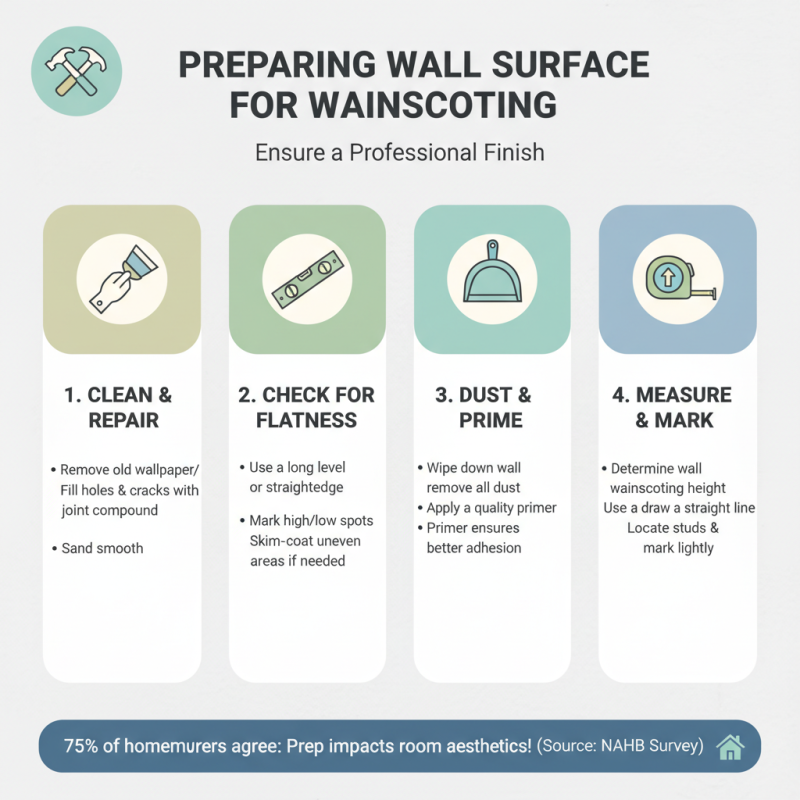
Preparing the wall surface is a crucial step when installing flat panel wainscoting. A smooth, clean wall will ensure your wainscoting looks professional. According to a recent survey by the National Association of Home Builders, nearly 75% of homeowners believe wall preparation impacts the overall aesthetic of a room. Poorly prepared surfaces can lead to uneven panels and finishing issues.
Begin by removing any old wallpaper or peeling paint. Scrape off debris and dust, leaving a clean canvas. Inspect the wall for cracks or holes. Data from the Remodeling Impact Report shows that 30% of homeowners face structural issues that need repair before any installation. Don't skip this step; it impacts longevity and appearance. Fill in gaps with spackle, and sand the area until it's smooth. Remember, a little imperfection now can lead to significant flaws later.
After preparation, consider priming the surface. This step can improve adhesion and ensure the paint or finish looks even. Many experts recommend a primer specific for wainscoting materials. When installing, double-check alignment and leveling. An uneven installation can lead to frustrations, especially when applying finishing touches. Details matter. Taking the time to prepare the wall correctly can save countless hours of adjustments later.
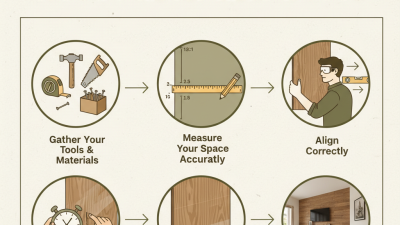
Measuring and Cutting Panels for a Custom Fit
When it comes to installing flat panel wainscoting, measuring and cutting panels accurately is crucial. Start by measuring the wall space carefully. Use a tape measure to record the height and width.
Double-check your measurements before cutting. A small error can lead to big problems later on.
Tip: Mark your measurements on the panel itself. This helps you visualize the cuts you need to make. Use a square to ensure your lines are straight. Cutting too short can leave gaps. Cutting too long may require rework. It's better to cut less than to cut too much.
After cutting, fit the panels in place before securing them. Sometimes, they'll require a bit of trimming for a perfect fit. Use a level during installation to ensure everything aligns properly. Remember, small adjustments may be necessary.
Reflecting on your progress can reveal flaws and improve your technique. Each step is an opportunity to refine your skills.
Techniques for Securing Wainscoting Panels to the Wall
Installing flat panel wainscoting can enhance any room, but securing the panels properly is crucial. According to a report by the National Wood Flooring Association, improper installation can lead to warping or detachment, which is a setback for any DIY project. The best practice involves using a level and measuring each panel accurately. Ensure the wall is prepped and clean too. This step can dramatically affect the outcome.
Adhesives serve as an essential detail for securing the panels. Use a construction adhesive designed for the job, applying it in a zigzag pattern. This helps evenly distribute the load across the panel. Additionally, manual fastening with finishing nails can provide extra support. The nail holes require careful filling to maintain a clean look, which many overlook. It's crucial to remember that even minor imperfections can detract from the overall aesthetic.
Always check the manufacturer's recommendations for spacing and additional supports. Painters often find hidden issues once they start applying a finish. This can lead to extra work, costing time and materials. Visibility of seams should also be taken into account. A quick touch-up can turn into an unexpected challenge. These details matter, as they contribute to the long-term durability of your wainscoting.
Flat Panel Wainscoting Installation Techniques
Finishing Touches: Caulking and Painting Your Wainscoting
When it comes to caulking and painting your flat panel wainscoting, the finishing touches can significantly impact the final appearance. Industry reports indicate that proper caulking can enhance the durability of wainscoting, as well as improve its aesthetic appeal by eliminating gaps. Aim for a clean seam between the wall and wainscoting to avoid any unsightly imperfections. Experts suggest using high-quality acrylic latex caulk to achieve a seamless look, which tends to outperform cheaper alternatives.
Painting is another crucial step in achieving a professional finish. The choice of paint can play a pivotal role. Reports show that satin or semi-gloss finishes are often preferred because they offer durability and easy cleaning. It’s essential to apply primer before painting. This technique helps the paint adhere better and provides a more uniform color. However, applying too thick a coat can lead to runs or uneven surfaces, which can detract from your hard work. Remember to allow adequate drying time between coats to avoid these mistakes.
Consider your workspace, especially with ventilation. Poor air circulation can lead to uneven drying, which affects the paint quality. Sometimes, the color choice may not match your expectations once applied. Testing a small patch on a less visible area can save you from a regretful decision later. It's all about getting the details right, and sometimes that requires going back to fix what isn't working.